doctor runs health checks on the home directory layout, encryption availability, and provider parsing. All checks should pass. For other install paths, see Installation.
When you’re not sure of the right command or flag, read the built-in help before guessing. authsome --help lists every top-level command; authsome <command> --help shows the flags for that command. Agents driving the CLI should consult these before falling back to web search.
Install the Authsome skill into your agent. The skill teaches the agent how to call Authsome when it needs credentials. It handles missing credentials, revokes and re-logs in on 401s, asks for --scopes on 403s, and never asks you for tokens directly.See Agent integrations for per-agent install paths (Claude Code, Codex, Cursor, OpenCode, LangChain, LlamaIndex, OpenAI Agents SDK, Anthropic SDK). The pattern across all of them is the same: drop the skill into the agent’s skill / context directory, then ask the agent to perform a task that needs an external service.Sample tasks that exercise the skill:
Star the repo agentrhq/authsome.Get my last five emails from Gmail.Check my Stripe balance.
The agent runs authsome login <provider> itself when it hits a missing credential. The browser opens on your machine for the OAuth consent, then the agent picks up from there with the proxy-injected token. You do not paste any keys.
If you’re scripting against authsome directly or you want to manually pre-seed a credential before launching anything, drive the CLI yourself.Pick one of the two setup tracks below. The first uses GitHub plus OpenAI and produces a runnable demo agent; the second uses Notion via MCP and skips OAuth-app setup entirely.
GitHub doesn’t support Dynamic Client Registration, so before your first authsome login github you need to register an OAuth app once. This is a one-time setup.
The button sits at the top right of the OAuth Apps list.
3
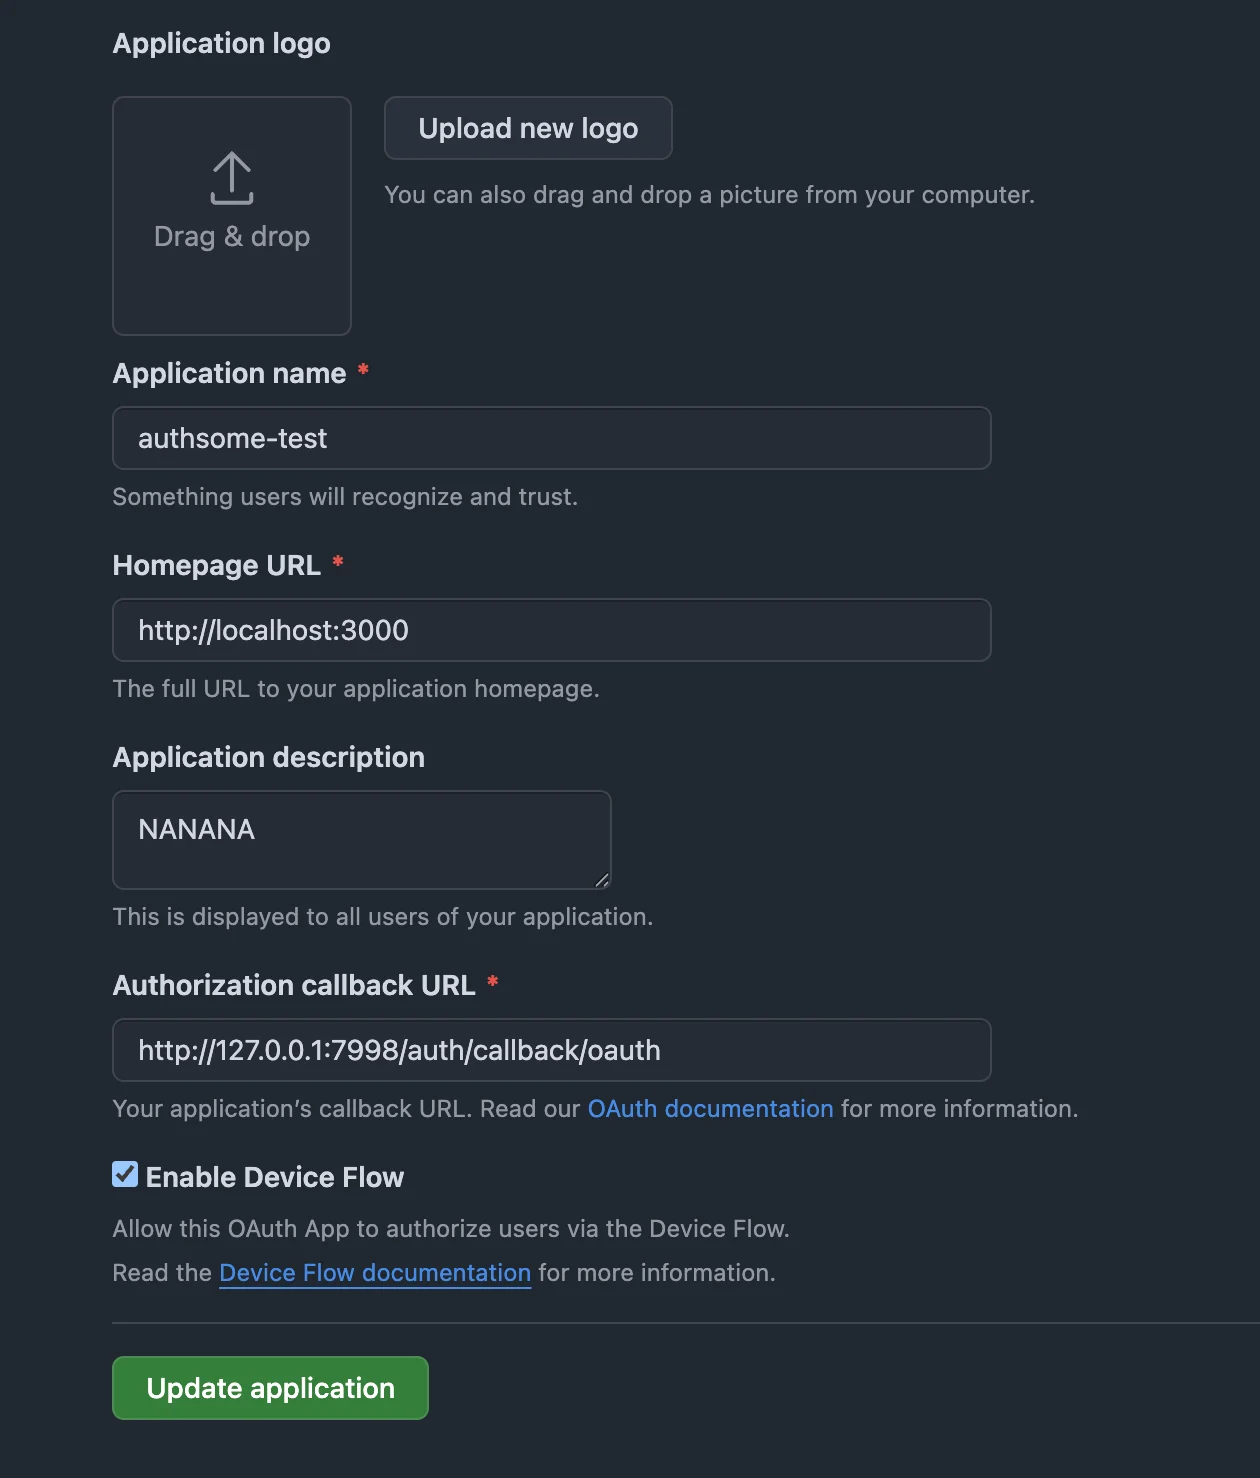
Fill the registration form
Field
Value
Application name
Anything memorable, e.g. authsome (local)
Homepage URL
http://localhost:3000 (any URL works; GitHub doesn’t validate it for OAuth functionality)
Application description
Optional
Authorization callback URL
http://127.0.0.1:7998/auth/callback/oauth
Enable Device Flow
☑ check it on
The Authorization callback URL must be exactly http://127.0.0.1:7998/auth/callback/oauth. Authsome’s PKCE flow listens only on this address; any other value will fail with redirect_uri_mismatch at login time.
Click Register application.
4
Copy the Client ID and generate a Client Secret
GitHub now shows your new app’s settings.
Copy the Client ID.
Click Generate a new client secret and copy the secret immediately.
Save the Client Secret somewhere safe (a password manager) before navigating away. GitHub shows the secret only once. If you lose it, you’ll need to generate another one and update your authsome connection.
You’ll paste both values into authsome’s local browser bridge on the next step. They’re stored encrypted in your vault and reused on every subsequent login. They are never accepted as command-line arguments.
Authsome opens a local form at http://127.0.0.1:7998 asking for your GitHub OAuth credentials.
2
Paste the Client ID and Client Secret
Paste the values you saved during the OAuth app registration. They’re encrypted and stored locally; you won’t be asked for them again unless you authsome revoke github.
Authsome's local bridge form for GitHub OAuth credentials
3
Approve access on GitHub
A second browser window opens to https://github.com/login/oauth/authorize. Click Authorize to grant the requested scopes (repo and read:user by default). GitHub exchanges the authorization for an OAuth access token, the callback lands on http://127.0.0.1:7998/auth/callback/oauth, and authsome stores the token encrypted in your vault. The terminal prints Successfully logged in to github (default).The stored access token is what later commands inject. client_id and client_secret identify your OAuth app to GitHub; the access token is the user-level credential that makes API calls on your behalf. You don’t need a separate PAT.
4
Confirm the connection
authsome provider list
GitHub should show as connected.
For other providers, see Agent integrations or the per-provider page under OAuth providers. API-key providers like OpenAI don’t need an OAuth app — see the next section.
API-key providers like OpenAI use the same login command, but the flow opens a local form so you can paste the key without it appearing in shell history or process listings.
A minimal agent that uses both credentials you just set up: it stars agentrhq/authsome on GitHub (a small thank-you to the project) and asks OpenAI to write a one-line celebration. The same script works whether you export env vars first or wrap the command with authsome run --. Save it as my_agent.py.
View my_agent.py (Python, standard library only)
# my_agent.py# Stars agentrhq/authsome on GitHub and asks OpenAI to write a one-line# celebration. The same script works whether you eval $(authsome export ...)# first or wrap the command with `authsome run --`. Under the proxy,# the env vars below hold the placeholder `authsome-proxy-managed`;# the proxy substitutes real values in outbound HTTPS to api.github.com# and api.openai.com.import jsonimport osimport urllib.requestdef http(method: str, url: str, token: str, body: dict | None = None) -> dict | None: req = urllib.request.Request( url, method=method, headers={"Authorization": f"Bearer {token}"}, ) if body is not None: req.data = json.dumps(body).encode() req.add_header("Content-Type", "application/json") with urllib.request.urlopen(req) as r: raw = r.read() return json.loads(raw) if raw else None# 1. Star agentrhq/authsome with your GitHub OAuth token.http( "PUT", "https://api.github.com/user/starred/agentrhq/authsome", os.environ["GITHUB_ACCESS_TOKEN"],)print("Starred agentrhq/authsome.")# 2. Ask OpenAI to celebrate the moment.answer = http( "POST", "https://api.openai.com/v1/chat/completions", os.environ["OPENAI_API_KEY"], { "model": "gpt-5", "messages": [ { "role": "user", "content": ( "Write a single playful sentence to celebrate " "that I just starred the authsome credential broker." ), } ], },)print(answer["choices"][0]["message"]["content"])
Zero pip dependencies — just the standard library. Now pick how to give it credentials.
Best for production-style agents. Authsome starts a local HTTP proxy that intercepts outbound requests to known provider hosts and injects the auth headers. The child process never sees the raw secret.
authsome run -- python my_agent.py
Inside the child process, OPENAI_API_KEY is set to the placeholder authsome-proxy-managed. The real key is added to outbound requests at the proxy layer.
HTTPS interception requires the mitmproxy CA certificate to be trusted on your machine. See Proxy networking if you see TLS errors.
Notion’s MCP endpoint at mcp.notion.com supports Dynamic Client Registration. You don’t need to create an OAuth app — authsome registers a client for you on first login.
Authsome POSTs to https://mcp.notion.com/register and Notion’s OIDC server issues a fresh client_id and client_secret. They are stored encrypted in your vault.
2
Approve access in the browser
A browser window opens to https://mcp.notion.com/authorize. Click Authorize to grant access to your Notion workspace. The callback lands on http://127.0.0.1:7998/auth/callback/oauth and the terminal prints Successfully logged in to notion_dcr (default).
3
Confirm the connection
authsome provider list
notion_dcr should show as connected.
That’s the entire setup. No OAuth app to create, no client credentials to paste.
The Notion DCR token authenticates requests to mcp.notion.com, which is an MCP (Model Context Protocol) endpoint, not a REST API. To put the connection to work, wire it into an MCP-aware agent:
Claude Code — add an MCP server entry wrapped in authsome run --.